Archive for July, 2008

Garden Group Photos

These will be the last pictures of my little container garden all in the same place.  My current roommate, Jenn, is going to take the cucumbers to her new place, while I’ll let the rest of the plants live out the summer at Tim’s.  I’m going to miss going out on the balcony each morning to visit them.  Everything has been growing so wonerfully – take a look!

theyre going to take over the world!

We even have multiple cucumbers ready, although they look a bit like spheres!

looks like a melon!

this one fell down - I'm going to eat it today

We’ve been eating lettuce like crazy – salad, yum!

nom nom nom like a bunny

Green onions go on salads too (and just about everything else)!

hmm, maybe I planted too many!

Last, but certainly not least, the basil is reaching epic heights:

I really like this picture!

We also have a tiny critter living in our garden space – this picture is a little blurry, but you should get the idea.

ahhhhhh!

Usually I am a big scardey-cat when it comes to spiders, but it’s outside and small, so I’ve been leaving it alone for now.  I do, however, keep bumping into it’s web (one time with my face – ew!) since it keeps moving it every day or two.  But the web sure is pretty.

Risotto Splendor

I think risotto is one of my favorite foods.  It is full of wonderful cheesy-creamy goodness.  Yes, it takes a lot of patience to cook, but it’s not actually that difficult.  We made this pretty simple, just with some garlic and butter to saute the rice with at the beginning.  We added in some Portuguese sausage with the Parmesan cheese and topped it all with some young scallions from the garden.  Delicious!

We also had a salad featuring home grown lettuce.  Nothing is better than eating the food you grew yourself!

And yes, that is a beach themed paper plate.  I’m moving in a few days (actually, this meal was an effort to use up food, like that 8 cups of chicken broth in the freezer!) and all of the real dishes are packed!  Crafty-ness might be slim for a while since I had to box up all of my supplies yesterday.  I did allow myself to keep out one grocery bag full though – I’d be lost without them!

I Can Haz Brains?

Apparently I never made a zombie army like I wanted to back when I first got Creepy Cute Crochet.  But, I have finally made ONE zombie!  He is extremely ferocious about eating brains – it’s all brains all the time with this zombie!  I think I’ll name him Fred.

Rockin’ Blue Dress

I finally finished this gorgeous dress that I said I’d make way back in April.  I’d had it mostly done for a while and it turned out to be too big, so I had to rip out the back seam and take it in a bit before putting the zipper in.  Now it fits great though!  (Please excuse the it’s ten pm and I’ve been paking  boxes for the last two hours hair.  Thanks.)

Speaking of zippers – I have to show off my zipper skillz.   I don’t remember when I learned this technique, but I love it.  Basically, I baste closed where I want the zipper to be and press open the resulting seam.  I align the zipper with the seam and pin securely in place.  Using the zipper foot for my machine, I sew one side of the zipper down (with it zipped up), taking care to sew parallel to the seam.  I then re-pin the zipper so the un-sewn side lays flat and sew it down as well.  Then, I just rip out the basted seam and it’s done and the zipper is hidden from view.  Like this (also notice how nice the ribbon lined up – I was pumped about that!):

Also, it’s hard to see from the picture above, but there are these pretty pleats in the front – here’s a close-up view:

Pie Salad

This is one of those “salads” that prominently feature mayonnaise.  If that grosses you out, you probably want to stop reading now.  But I will warn you – it grosses me out a little bit too, but this is oh-so-delicious that I just don’t give a damn.

So, you start with a basic pie crust and bake it like you are going to make a pudding pie – just the empty crust in a pie dish.  (Remember to poke it a few times with a fork so it doesn’t get all bubbly.)  I cheated and used a pre-made one.

After the pie crust cools, layer a few lettuce leaves over it.  I used some from my garden – whoo hoo!  Next, mix about 1 cup of mayo with a teaspoon of seasoned salt.  Put half of this over the lettuce.  Add some frozen peas, shredded cheddar cheese (about a cup of each) and 1/4 cup of green onions.  You can also add some water chestnuts.  Next up is the rest of the mayo followed by 3 hard-boiled eggs (sliced), a cucumber or tomato (or both, you know… whatever!), and some crumbled up bacon – I used about half a pound, but you could get away with less and it would still be pretty bacon-y.  Eat it. Yum.  Or let it sit in the fridge for a few hours – it’s good either way.  After eating it, you should probably go for a walk or something.

Honey Soy Pork Stir Fry

Tim and I made this wonderful dinner last night.  The best part of it was that we just decided to wing it through the whole thing.  There were a lot of veggies from the garden ready, like squash, zucchini and carrots.  We added those, plus mushrooms, red pepper and broccoli to some stir fried pork.  We finished the whole thing with soy sauce and honey for a delicious meal that we ate over some egg noodles.

At the store also I felt compelled to buy some peaches and raspberries.  We soaked these in amaretto while we ate our dinner, and then cooked them down with just the tiniest bit of butter.  The raspberries competely fell apart, but it was still wonderful served over vanilla ice cream for dessert! Of course, we also saved the amaretto that we soaked the fruit in and poured some of that over our ice cream as well.  Yum!

I’m Noshing on Awesomeness

Or should that be people are noshing on my awesomeness?  Either way, this is an exciting day!  Today my post about the twice baked potato caserole is being featured on Blog Nosh!  Blog Nosh is a site that promotes older posts on a variety of blogs from all sorts of different categories.  You should definitely check it out! And thanks to Catnip for getting my post up there!  :)

Silly Little Turtle

I made this silly little amigurumi turtle the other day for our secretary.   She totally loved him and promptly named him Timothy.

On a side note, this is what happens when all of the following happens:

  • I’m at work (and the only one)
  • I’m bored
  • I’m feeling silly
  • I have at least 2 amigurumi critters at my desk
  • I wonder how close a (free, online) voice synthesizer can sound to that movie voice-over guy
  • I have my camera handy

There – now you all know how crazy I am in that very specific scenario!

Jewelry Party

Taking a break from crocheting, I went to a jewelry making party!  Although it was a little smaller than we expected, we still had a pretty good time.  Here’s a little sampling of the things we made.

Laura K. made this beautiful necklace – which she decided to drape on the lamp, where it looked surprisingly pretty!

Laura B. made this really cute bracelet with purple and yellow-green beads.

I spent most of my time on this necklace, where all the beads are spaced out on clear thread, held together in place by crimp beads.

Laura K. also showed me how to wrap wire around beads – so I made this pair of earrings as practice.

It’s been a while since I’ve made any jewelry, but this little get together was the jump start I needed to get back into it.  Thanks girls!

I-Am-A-Robot

A cute little amigurumi robot to round out the week.  I can’t get over the cuteness that is this robot!  This is one of the more involved amigurumi toys that I’ve made so far.  It’s about 3 1/2″ tall – just the perfect size to sit on a desk, so every once in a while you can pick it up and talk like a robot and make a  blblblblblblblb noise as you fly it around the room.  :)

Tomato (Lemon) Basil Garlic Pizza

On Sunday, my car broke down and had to be towed, and I was pretty upset.  So I turned to comfort food, namely pizza.  (Ok, there was some wine involved too, but I still managed to make pizza, so I’m calling it good!)

While making this pizza, I was aiming for simple flavors that were spectacular when all mixed together.  The dough for the crust was pre-made from Whole Foods, which is also where I found the smoked mozzarella.  The sauce is simply crushed tomatoes.  I sliced up about three big garlic cloves and tossed them on there, along with some lemon basil and some regular basil from my container garden.  I used both types because I don’t have a lot of either yet (they’re still growing like crazy though).

The lemon basil was a nice little flavor mixed in there.  I don’t feel like it is as strong as the regular basil, so the lemon flavor wasn’t overpowering.

I baked this at 400F for about 15 minutes.   I don’t like the crust too brown, so once it started to turn, I took it out.

The pizza was incredibly delicious!  The crust was really good, I would definitely buy the same dough again.  It reheated well too, I just had the last of the leftovers for lunch a little bit ago.  Yum!

HOW TO: Make a Sumo Wrestler Amigurumi

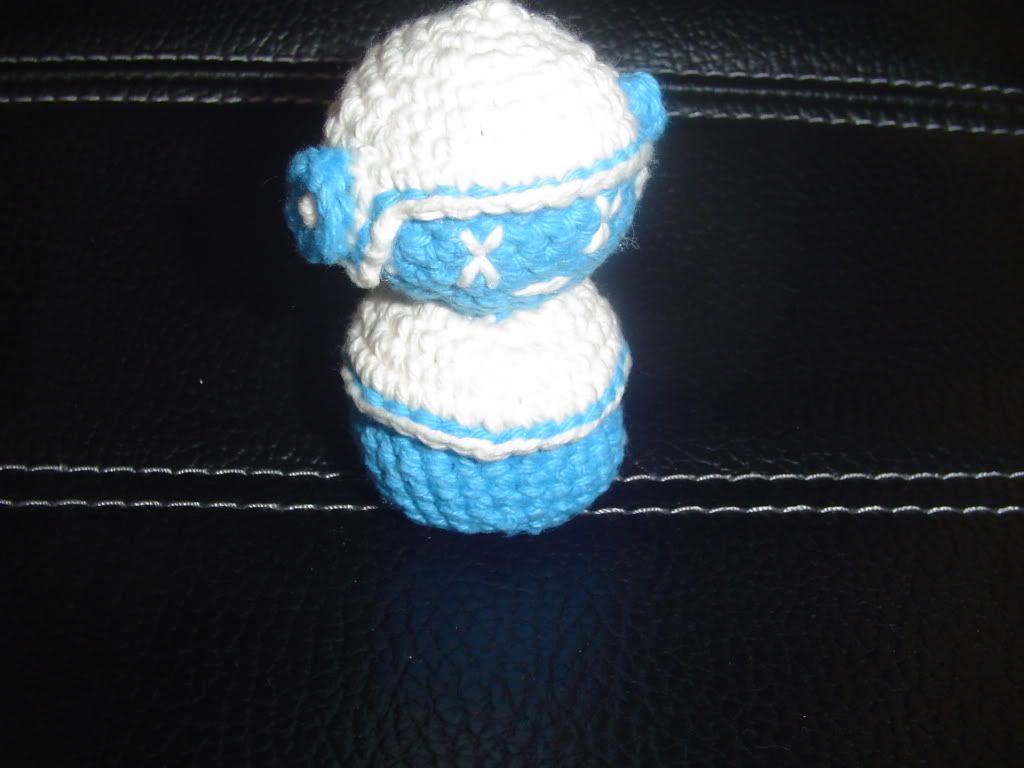
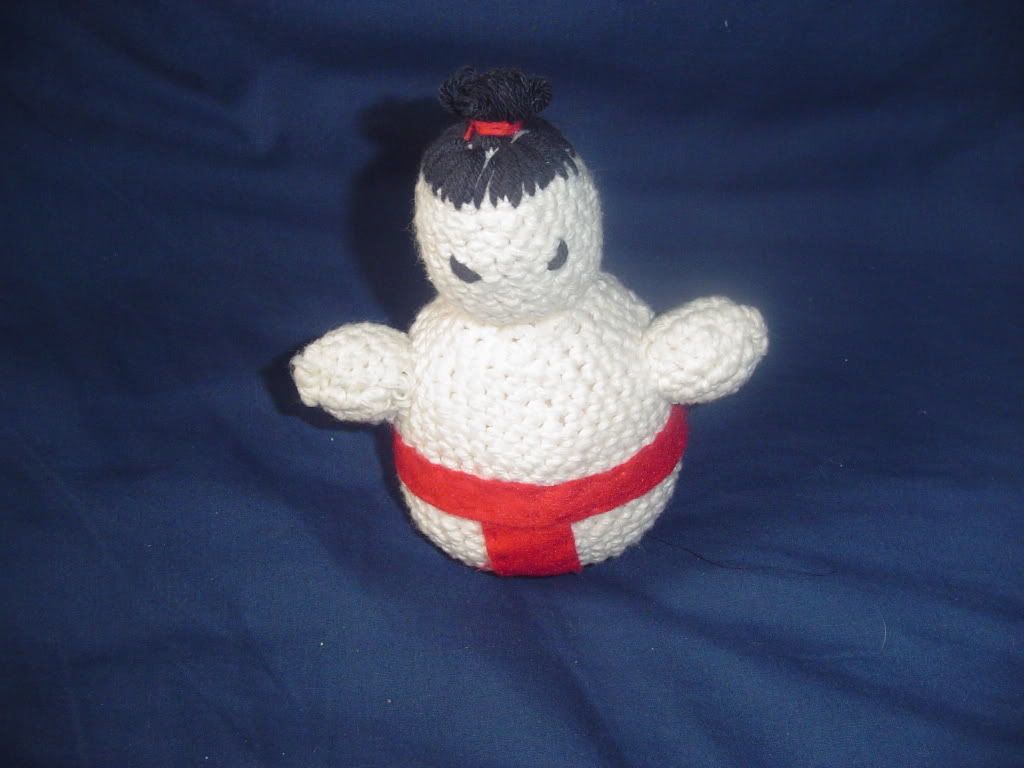
I need to stop being challenged to crochet things, because when I unexpectedly have a block of free time, I tend to use it up by figuring out how to make them!  Here is probably the most awesome thing I have ever made – sumo wrestler amigurumi.  You know you want one!  Here’s how:

Materials:
Lily Sugar & Cream in Soft Ecru
Lion Brand Cotton Ease in Charcoal
Red felt
Red thread
Size E hook

Body:
R1: sc 6 in magic ring (6)
R2: [inc] around (12)
R3: [sc, inc] around (18)
R4: [sc 2, inc] around (24)
R5: [sc 3, inc] around (30)
R6: [sc 4, inc] around (36)
R7: [sc 5, inc] around (42)
R8-19: sc 42
R20: [sc 5, dec] around (36)
R21: [sc 4, dec] around (30)
R22: sc 30
R23: [sc 3, dec] around (24)
R24: [sc 2, dec] around (18)
R25: [sc, dec] around(12)
stuff body
R26: [sc, dec] around (6)
fasten off, leaving a long tail for sewing

Head:
R1: sc 6 in magic ring (6)
R2: [inc] around (12)
R3: [sc, inc] around (18)
R4: [sc 2, inc] around (24)
R5-11: sc 24
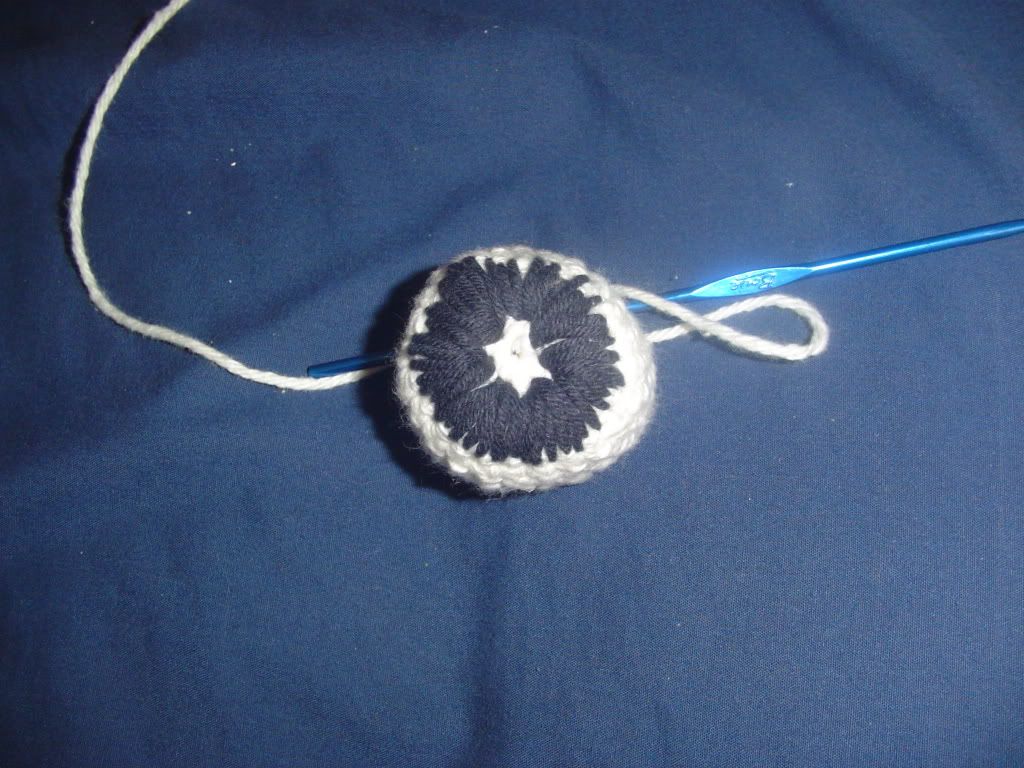
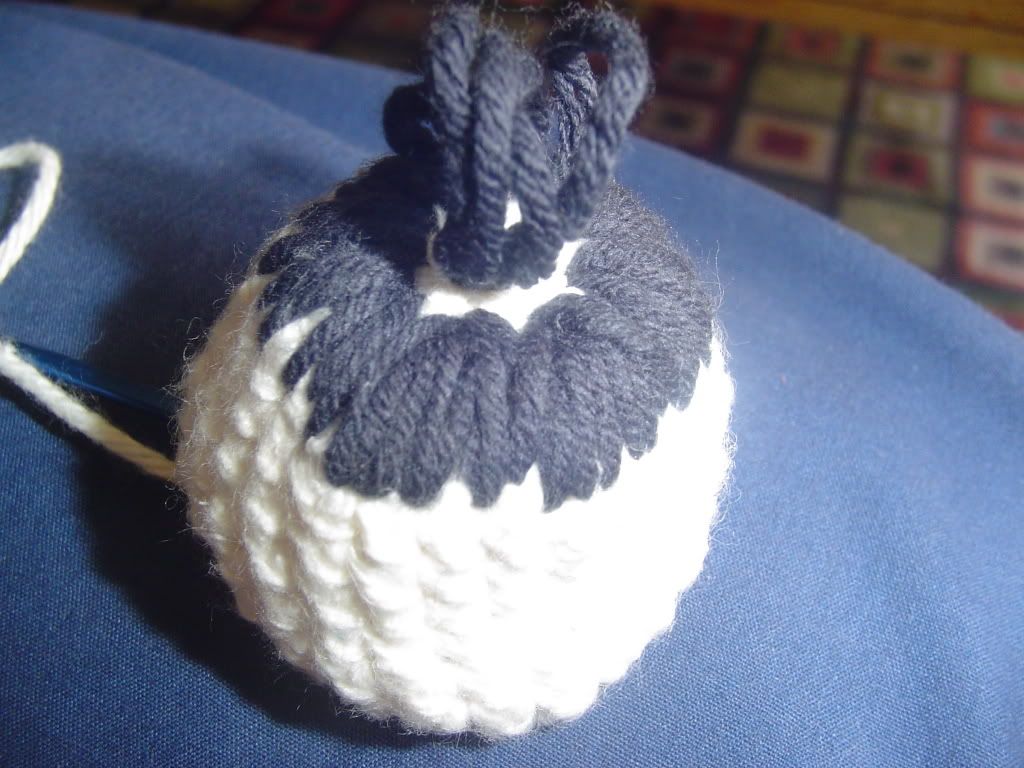
work on hair and eyes – see pictures for how to work hair
R12: [sc 2, dec] around (18)
R13: [sc, dec] around (12)
stuff head
R14: [sk 1, sc] around (6)
fasten off

To work the hair, I first sewed on black yarn in a ring around the top of the head, leaving the very top open.

Next, I cut about 20 pieces of black yarn into 3 inch long segments.  I threaded each segment up from the inside edge of the existing ring of hair, and then back down through the center hole. This part is really time consuming (and a little hard to explain, so if you’re confused, please let me know!).

After filling it in all the way around, I used a tiny scrap of red yarn to tie it off on the top.  I did the same inside the head, and then trimmed the edges.

Arms:
R1: sc 3 in magic ring (3)
R2: [inc around] (6)
R3: [sc, inc] around (9)
R4: [sc 2, inc] around (12)
R5-7: sc
fasten off, leaving a long tail for sewing

Attach head and arms to body
Sew on the felt thong
Play with your new Sumo Wrestler!  The finished size is about 6″ tall.

I thought about making two so that they could wrestle with eachother, but so far I haven’t made it there!

The First Flower Sighting!

I realize that I haven’t been very exciting this week as far as blogposts go.  It’s been more exciting in real life, which is probably why I haven’t had a lot of time to do anything worthy of posting.  I’m going to continue that trend today – but I promise after the weekend I should have lots of fun things to share!

I woke up this morning and saw that one of our cucumber plants has it’s first flower!  So pretty!  (Upon looking at the flower a little longer in this picture though, I began to realize that it looks a little bit like a starfish…. I’m not really sure what that means – but I like starfish, so it can’t be bad, right?)  This means cucumbers will start growing soon… yum!

In other astounding garden news, the lemon basil has really taken off!  I’ll probably have to start using some of it soon (darn!).

Happy Little Cactus

I wasn’t kidding when I said that I couldn’t stop with the crocheting.  Here’s Mr. Cactus, from the seriously cute crochet book.  He’s about 6″ tall, so pretty big I feel like as far as amigurumi goes.   This took me about 3 or 4 days to finish.  The green and white are one piece and then the brown pot is separate.  I pretty much think that he’s the cutest thing I’ve ever seen!

Thanks Grandma!

A few weeks back, when I last saw my grandmother, I had mentioned to her that I was having trouble figuring out how to double crochet.  I asked her if she could show me, but we never had a spare moment to sit down during all the craziness of a large family get together.  I eventually figured it out, but yesterday in the mail from her, I got this:

This is the book that she used to teach herself how to crochet.  Copyright 1959.  The price was 29 cents.  Not only does it have basic crochet instructions, it has some patterns, such as this cute tote bag, which I think I might try!

There are also instructions for knitting, tatting and embroidery.  This little book rocks!

Even with all this awesomeness, the following pages are my favorite part.  My grandmother made little notes all over the pattern for these mittens.  It’s mostly just her counting her rows, but it is a little piece of her that I will always have, no matter what.


craftykeg’s blog

Craft, food, fun and creativity all come together here!

Subscribe to craftykeg!

Handmade Christmas

Projects Done: 34
Projects to Go: 0!

All projects are finished! Check back here after Christmas to see pictures of everything all together, and all of the super secret projects!
July 2008
S M T W T F S
 12345
6789101112
13141516171819
20212223242526
2728293031